Dark Theme | Category: Code, Educational
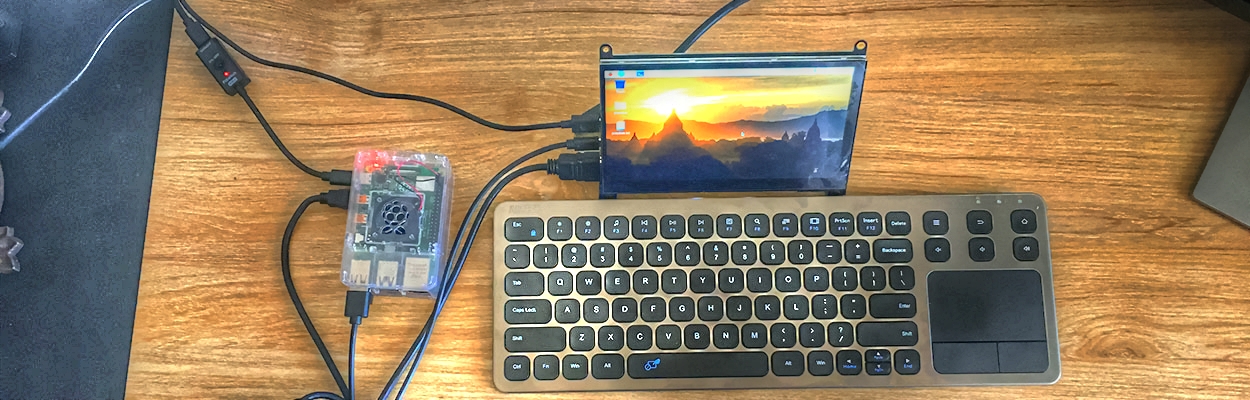
My Raspberry Pi Build
It has only been a few weeks, but already my Raspberry Pi, Janet, and I are thick as thieves. In this post, I’ll take you through my current build, what everything cost*, the reasoning behind my choices, other options you have, and how I feel about each piece so far. If you’re inspired to get started with the Raspberry Pi, I hope to leave you well-informed with some ideas for your own build.
*Note: The prices you’ll see here represent the price for each item on Amazon at the time I made my purchase. The current price may be different as prices on Amazon tend to fluctuate, and you may find a different price from other retailers.
The Raspberry Pi 4 Model B
CanaKit Raspberry Pi 4 4GB Basic Starter Kit w/ Fan – $82.99
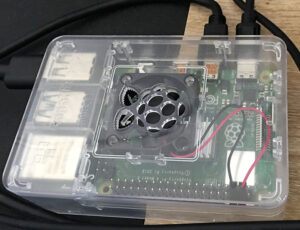
The latest model (at the time of my purchase) is the Raspberry Pi 4. Since I’m not too experienced with hardware, I decided to buy a kit that comes with not only the Pi itself, but also some basic cords and accessories to get started. The CanaKit I chose came with a fan, which I really like because cooling is so important when it comes to delicate electronic devices. It didn’t come with a memory card, although some of the CanaKits do. At the time I made my purchase, it was cheaper to buy the kit and a 64gb micro SD card separately than it was to buy the kit that came with a 32gb micro SD card, so buying them separately just made the most sense. CanaKit offers kits with cases in black, white, and clear. I chose the clear case because I think it’s cool to be able to see all the components inside, and also so that I can keep an eye on the dust situation because I know how dusty my desk gets and I want to keep Janet safe. You can also buy a nifty case from the official Raspberry Pi website, and you’ll find some really great ones on Etsy as well.
The Micro SD Card
Samsung EVO 64gb micro SDCX Card – $11.99
Not super exciting, just your average run-of-the-mill micro SD card. In case you skipped down here without reading my explanation above, it was cheaper to buy a 64gb SD card separately than it would’ve been to get a kit that came with a 32gb SD card. I have a SanDisk version of this SD card that I use in my dashcam and so far I have never had an issue with either one. Both versions came with an adapter so I could format them in my laptop before use.
The Keyboard
Arteck Wireless Keyboard w/ Built-in Track Pad – $27.99
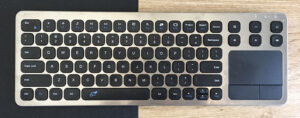
I wanted the keyboard/mouse combo platter for two reasons: to avoid taking up two USB ports on the Pi, and to reduce the amount of separate pieces I’d need to worry about moving around/storing with limited desk space. It’s also the configuration I’m most comfortable with because I just use the trackpad on my laptop for work and play. Arteck had great reviews and I really liked the sturdy design of this keyboard. I’ve known some people who swear by Logitech accessories and there is a similar Logitech version as well. If you don’t feel the need to have a mouse and a keyboard in one unit, your options are pretty darn vast here. Plus, bluetooth comes standard on the Raspberry Pi 4 Model B (as does WiFi), so you can opt for a keyboard with bluetooth connectivity to free up yet another USB port.
The Monitor
Lebula 7″ Touchscreen Monitor – $76.99
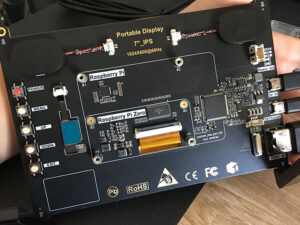
I have a 27″ Dell monitor that’s my day-to-day work monitor, and I can connect it using the HDMI to Micro HDMI cable that came with the CanaKit. I chose to get this monitor as well mostly just because I wanted to play with the touchscreen. You can attach the Raspberry Pi to the back of the monitor if you’re going for more mobility, but I chose to leave Janet in her case because of how dusty my desk gets. So far I’m very happy with this monitor! If you’re thinking of purchasing this model, there are two considerations you should be aware of: 1) air bubbles under the screen protector decrease touch sensitivity, so unless you have a magic method for perfect screen-protector-to-screen contact, you may want to leave on the flimsier screen protector that comes on the screen, rather than replacing it with the one that comes separately. 2) the power cable this monitor came with is very short – which can be convenient if you’re connecting it to a battery pack for a mobile build, but if you’re using it on your desk and your power source isn’t going to be right behind it, you may want to replace it with a longer cable. Now for some pros and cons:
Pros: It comes with little feet you can screw on so it has a stand, it’s light but sturdy, you can attach the Pi to the back of it (and there’s even an alternative wiring method for that), and it comes with a screen protector.
Cons: It requires two points of contact with the Pi (if you’re not attaching the Pi to the back of the monitor, it uses one connection to the mini HDMI port and one connection to a micro USB port to enable the touch feature). It comes with a standard HDMI cable rather than the HDMI to micro HDMI cable that the Raspberry Pi 4 requires, so you’ll need to buy that separately if you didn’t purchase the CanaKit (or another kit that includes that cable).
Total cost to recreate my build: $199.96
Note: Shipping was free because I ordered everything from Amazon and I have Prime. I live in CA where sales tax is pretty high, so after tax the total came to a little over $207.
In the future I’d love to take Janet on the road by building her a deck and adding a mobile power source to the outfit. I also have my eye on a bluetooth keyboard that resembles a typewriter, but that’s just the writer in me. Feel free to comment below or DM me on Instagram or Twitter with any questions you have about my build. If you already have a Pi (or several) I’d love to hear about your build(s) and projects!
</ XOXO>
[Photo credit: CodeCopyCoffee]