
Dark Theme | Category: Code, Educational
How to Personalize Your Bash Shell Prompt
First, the shell you’re using: Pop open your Terminal and look at the very top of the window – it probably says either bash or zsh. I prefer Bash for my own personal use, so that’s what we’re doing here today, but absolutely no shade if you’re a Z Shell stan. If you do want/need to change between them, you can use this command: chsh -s /bin/bash or chsh -s /bin/zsh. You’ll be prompted to enter your password, and then you’ll need to open a new Terminal tab or window to see your change take effect.
Next, your shell prompt: Your shell prompt is the text that appears on every line prior to any commands you enter, like your username in an AIM chat (hi, I’m old). To change what appears there, you’ll edit your .bash_profile file, which lives in your home directory. You can do this using the nano editor by simply typing cd from wherever you are to get to your home directory, and then typing nano .bash_profile. Now find the line that begins with PS1=. I recommend moving the content after the = down a line and commenting it out by adding a # in front of it so that it’s easy to restore your default prompt later if you so choose. Everything you put after the = makes up your shell prompt. To save your changes in the nano editor, hit ctrl+X (not command, even on a Mac!), press y to confirm that you wish to save changes, and then hit enter to save changes and exit the editor. If you don’t want to save your changes, just press n instead of y. Just like when it comes to changing the shell you’re using, you’ll need to open a new Terminal tab or window to see your changes take effect.
Now let’s get to customizing! In this post we’ll cover three customizations you can do:
1. Color!
2. Success Indicator
3. Current Branch
I chose these three specifically because they’re fun and they make your life easier, and when you spend as much time in the shell as a Teenage Mutant Ninja Turtle, isn’t that what you want? Okay, let’s go!
Color!
The way you colorize your bash prompt looks a little crazy, so I’m going to break it down step by step so it’s less intimidating.
Step 1: You’ll need to start with \[ and end with \], which you can think of as an opening and closing tag similar to other coding languages you’ve worked with. In Bash, they enclose non-printing characters.
Step 2: Next, you’ll need to use \033[ or \e[ to signal to Bash that the number it’s about to see represents a color code. You can use both in the same prompt interchangeably, but for your own sanity, please don’t.
Step 3: Choose your color code. The color code itself is a regular old integer. You can scroll to the bottom of this post for a great resource on color codes, but for the purpose of this example, let’s use 36 for cyan.
Step 4: Finally, you’ll use the letter m to indicate the end of the color code.
Putting it all together, you’d write \[\033[36m\] to initiate cyan text in your bash prompt. What I mean by “initiate” is: all the text after that color code will be cyan, unless Bash detects another color code – in which case it will switch all the text after the new code to the new color – or you “turn off” color by using 00 as the color code, in which case the text that follows \[033[00m\] will be the default color according to the theme you’re using.
Here is what this looks like in action (the top line is from my .bash_profile file, and the bottom line is my bash prompt):

Here you can see that I started with the code for cyan that we already know, and the text that follows it is indeed cyan. A second color code then changes the text after it to what looks to me like lavender but I think is technically light magenta, and finally a code using 00 turns colorization off and the last of the text is the default color. I left spaces on either side of the color codes to make them easier to read, and you can see that the resulting bash prompt honors those spaces without printing any part of the color code.
Now let’s say you’re like me and you switch up your color scheme regularly, and you don’t want to have to memorize or constantly be looking up color codes. Simply create variables with human-readable names, and use those in your prompt in place of the codes! Once again, the contents of my .bash_profile file are on top, and my resulting bash prompt is on the bottom.

You may have noticed that the color code for orange looks a bit more involved than the other color codes we’ve seen so far. That’s because it includes an ANSI sequence 38;5; before the actual color code, which is used for selecting colors in 256-color mode. The 0; at the beginning of that sequence is unrelated to the color, and instead it affects the font weight of your text – if you put a 1 there instead, your text will be bold!
Scroll to the bottom of this post for a handy reference guide to Bash color codes compiled by the man, the myth, the legend Jason Milkins – and keep in mind that the base theme of your Terminal (mine pictured here is One Dark) will affect the shade of the colors you see.
Success Indicator
I know you’ve always wanted to learn how to display a smiley face if your latest Bash command was successful and a sad face if it failed. Luckily for you, that’s what I’m going to show you now!
There are two key pieces of information to understand when it comes to this bash prompt customization. The first is that you can output the result of a Bash command in your prompt by placing the command between two of these symbols: `. That’s the backtick character, by the way, not a single quotation mark. On most US keyboards you’ll find the backtick symbol to the left of the 1 key, along with the tilde (~) character.
The second key piece of information to keep in mind if you’re new to Bash scripting is that $? is a special variable whose value is always the return code of the most recently executed command. A return code of 0 indicates that the command executed successfully. This makes it very easy for us to write a piece of code for our bash prompt that returns different output based on whether the last command we wrote was successful or not.
Let’s start with something very simple:
PS1=“\`if [ \$? = 0 ]; then echo ‘Yay =)’; else echo ‘Boo =(’; fi\` :”
Here’s what that looks like in action:
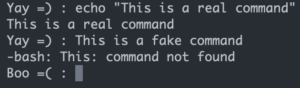
As you can see, my bash prompt starts out as “Yay =) : ” after successfully echoing the phrase “This is a real command”. After I try to run This is a fake command, my prompt becomes “Boo =( : ” because the word “This” isn’t a real Bash command.
I left the above example pretty simple and pared-down to make it easy to see what’s going on in the code. If I was really going to use this customization in my bash prompt, I’d probably do something like this:
PS1=“\`if [ /$? = 0 ]; then echo \[\e[32m\]^u^\[\e[0m\]; else echo \[\e[36m\]O_o\[\e[0m\]; fi\` \u@\T in \W: ” which gives me this:

In the bash prompt above, I get a green smiley face for a successful command, and a blue face that according to my husband is “not mad, just disappointed” for an unsuccessful command – along with some other useful information like the current time and the directory I’m working in.
Current Branch
Just like having your current working directory displayed in your prompt, having the branch you’re on as part of your prompt can be very useful, particularly if you do a lot of context-switching and/or find yourself working in several different repos throughout the day. To do this, we’re first going to write a function that outputs the current branch when we’re in a git repo, and does not throw an error when we aren’t in a repo. Then, we’re going to call that function in our bash prompt.
First, the function. Here’s what it looks like:
get_branch() {
git branch 2> /dev/null | sed -e ‘/^[^*]/d’ -e ‘s/* \(.*\)/(\1)/’
}
Whoa, what? I know – it looks bananas. Let’s break it down!
1. git branch – you probably already know what this piece does: lists all your branches with an asterisk in front of your current branch:

2. 2> /dev/null – This piece essentially says “if we’re not in a git repo, I know you’re going to want to print an error message, but please don’t do that because an error message in our bash prompt would be super annoying”. Let’s talk about how it does that. Bash recognizes three default files: standard input aka stdin (that’s your keyboard), standard output aka stdout (that’s your screen), and standard error aka stderr (error messages). If you know your arrays, you can probably see where this is going. Each one of those files is represented by a number: stdin = 0, stdout = 1, and stderr = 2. Here, we’re targeting stderr with 2. We then use the > character to redirect stderr to a file called /dev/null, which is, essentially, the void (see this article for a more in-depth explanation). Like a good bouncer, our bash prompt now snatches that undesirable error message and hustles it out of the club with a jacket over its head before you even know it’s there!
3. The pipe character | – This handy fella separates commands in Bash so you can string a bunch together. It doesn’t just work in your prompt, either, so you can use it any time you want to write several commands and have them execute in sequence without having to run them one at a time manually.
4. sed -e – Sed is a stream editor that essentially takes some text and does something with it. I know that’s vague, but there’s A LOT it can do! It can, and probably will, be a whole post on its own some day. For now, I’m going to focus on what it’s doing here, which is figuring out which branch you’re on based on the position of the asterisk and then serving it up to you neatly. The -e is called a flag, and it means “execute”, as in execute the following command.
(NOTE: If you’re now intrigued and trotting off to learn more about sed on your own, know this first: there are two “flavors” of sed, GNU sed and BSD sed. If you’re on a Mac, you’re using the BSD variety by default. There are syntax differences, so when searching for references and tutorials, make sure to keep this in mind and specify your searches accordingly.)
5. ‘/^[^*]/d’ -e ‘s/* \(.*\)/(\1)/’ – Here’s the fun part: the regular expression (aka regex) that tells sed how to parse the branch name given the input – the input being the result of the git branch command. Regex will also be its own post someday. For now, just note that there are two separate commands for sed to execute, separated by another -e flag. The first one is “locate the current branch by finding the text with the * in front of it” and the second one is “give us that text, but don’t include the asterisk”.
Now let’s put it all together and see it in action!
Here’s our .bash_profile file with our get_branch() function that we call in our bash prompt:

Based on the above, we expect to see a bash prompt of “Current branch = (branchName): ” when we’re in a git repo, and “Current branch = : ” when we aren’t.

And we do! When I first opened my Terminal I was in the home directory, which isn’t a git repo, so I had nothing after the =. Once I hopped into my example git repo, the branch I’m on showed up in my bash prompt. Finally, I ran git branch to double check that our prompt is displaying the correct branch, and as you can see from the output, I am indeed on anotherBranch.
Conclusion
Whew, you made it to the end! Well done! Now you can colorize your bash prompt, give yourself a celebratory smiley face for each successful Terminal command, and even include your current branch in your prompt so you never lose your place in a git repo. If you have any trouble getting any of these customizations to work, please feel free to reach out to me on Twitter or Instagram (@codecopycoffee on both) as I check those more frequently than email, and I will do my best to help. Alternatively, if you got your new personalized bash prompt up and running using any of what you learned here, I’d love for you to drop me a screenshot so I can see it and celebrate your success with you!
</ XOXO>
Enjoy my content and want to show your appreciation? You can buy me a coffee, share this post, or pay it forward and teach someone else!
[Photo credit: Blake Connally via Unsplash]
Bash Colors Reference Guide by Jason Milkins:
