
Dark Theme | Category: Code, Educational
Get Started Using the OpenAI API with ChatGPT
Hello Gentlefriends, and welcome to a blog post that is finally not about Bash! In this post we’ll be using Python to get started using the OpenAI API to work with ChatGPT. There are differences between Python versions so I recommend being aware of the version that you’re using – this will make it easier to troubleshoot any errors you get, as resolutions may be version-specific. In the CLI run python --version to see which version of Python you’re using. I will be using Python 3.10.0 on a Mac running OS Big Sur 11.7.3 with Intel (as in, no M1 or M2 chip – she’s old, y’all, but I love her).
Creating and Saving Your API Key
First, let’s get your OpenAI API Key. You’ll need to create an OpenAI account if you don’t have one already, so sign up or log in here: https://openai.com/blog/openai-api. Once you’re signed up and in, click on your user avatar in the upper right corner of the screen and select View API Keys in the dropdown menu. Click the + Create new secret key button. You don’t need to spend too much time coming up with a name because you can edit it later – in fact, you don’t need to name your API Key at all, although that just feels unnatural to me and my Type-A Virgo personality. For my use case, I chose to name my keys “Thelma” and “Louise” because I use Thelma for personal projects and Louise for work-related projects. Make sure to copy your key once you’ve created it.
Now we’re going to save your API Key as an os environment variable. You can hard-code it directly inside your Python file – and believe me, if you run into all the module errors I did, it will be tempting – but just because you can doesn’t mean you should. Using an environment variable is more secure. Plus, it saves you the hassle of adding your API key to multiple files when you really get going with the API, and also updating those files if you change keys. To do this, you’ll need to edit your .bash_profile file (or .zprofile, or .zshrc, depending on the shell you’re using). Using whichever editor is your favorite, add this line: export OPENAI_API_KEY="sk-whatever9your4key7is3"
Note: If you did what I have done a thousand times and copied the line above to paste into your editor, thereby overwriting your copied API key, and can no longer see your full API key on OpenAI, you can just make a new key and then delete the previous one.
Setting Up Your Python File
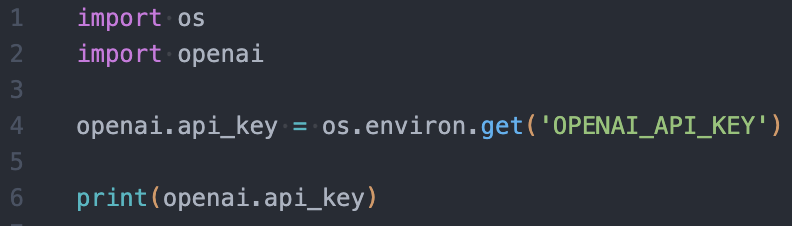
Now that your API Key is saved securely it’s time to make your Python file. I use VS Code with the One Dark Pro theme, so that is what you’ll see in the screenshots. To start with, create a new file and name it something like practice.py. It doesn’t have to be exactly that, of course, but be very mindful of naming collisions here. When I first started this project I went with “openai.py” and that caused issues with locating the openai module we’re going to be importing. To start, we’re going to import two modules we need, pull in our API Key, and make sure it’s showing up correctly:
import os
import os
import openai

openai.api_key = os.environ.get('OPENAI_API_KEY')

print(openai.api_key)
You can run this file by opening your Terminal, navigating to the directory where it’s saved (Home, Desktop, All My Sweet Code, etc.) and running python practice.py, but we don’t want to run it just yet. While os is a standard Python library, openai is one you will probably need to install. You can do so using pip: pip3 install openai
Note: I’m using pip3 because my Python version is 3 – if you’re using a different Python version, be sure to use the version of pip that corresponds to it. Once pip has done its thing, try running your Python file. If everything went well you should see your API Key printed out in your Terminal and you can skip the next section about troubleshooting. If you got errors, that’s okay! I did too, and that’s why I have some troubleshooting steps for you to try.
Troubleshooting Module Not Found and Bad Magic Number
If you’re getting an error that the openai module is not found, the very first thing you should try is uninstalling openai, upgrading pip, and then re-installing openai using the following commands:pip3 uninstall openai
pip3 install --upgrade pip
pip3 install openai
I know it seems too simple to be true, but it’s worked for people, and it’s worth trying the simplest solution first before getting into the path shenanigans we’re going to explore next.
If that didn’t work, it’s time to take a look at paths. When you run a Python file and the interpreter comes across import commands, it checks several paths to find the module. If the module is not located down any of the paths where the interpreter expects it to be – or if something else with the same name that isn’t the module is found first, like my openai.py file – you’ll get errors. First things first: let’s find out where your openai module is installed. Let’s ask our good friend pip:
pip3 show openai
The output of this command will give you information about the module such as version, author, and – what we’re interested in – Location. Make note of that path.
Now, let’s find out where your Python interpreter expects the module to be. In your file, keep the code we’ve written commented out and now add:import sys
print(sys.path)
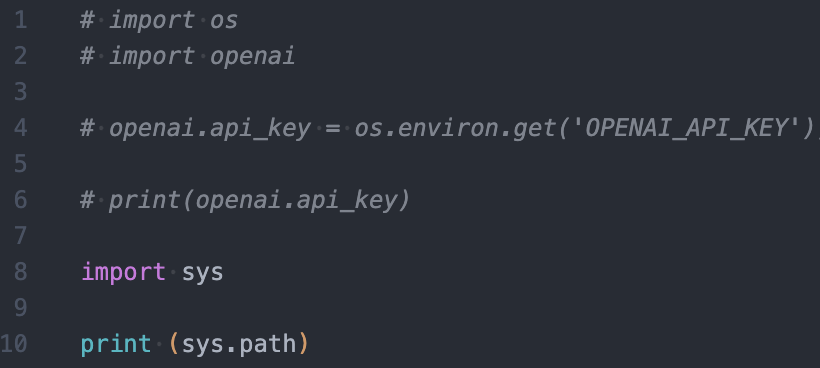
Run the file and compare the output to the actual path of the openai module. If those paths are not in alignment, the fix is actually pretty simple: head to where the openai module directory is actually located and copy it to a location the interpreter is checking. An alternative solution is changing your path, but that could affect other modules you’ve installed that are working.
If your paths are looking peachy but you’re still getting errors – including the dreaded “bad magic number” error – the solution may be clearing out your cache. You can do this by deleting the folder called __pycache__ or by running: find . -name '*.pyc' -delete
After deleting cached files, if you’re still getting errors, you can try deleting and re-installing the module with pip the way we did at the beginning of this section.
At this point, if you’ve tried everything and you’re still getting errors, I submit one last hacky non-solution that worked for me: move your Python file to a different directory and try running it. Full transparency: I moved my practice.py file from Desktop to my home directory and it runs just fine. I also tried making a new directory on my Desktop, copying it there, and running it from there, and it also runs just fine. It runs fine in Downloads too – pretty much anywhere other than where I created it originally, is the point I’m trying to make. I do intend to figure out why, and when I do I’ll share my wisdom. For now, though, I’m just accepting that this Hail Mary play worked out and I’m only sharing it in case the same thing works to get you unstuck, NOT because I consider it a genuine solution with which to be satisfied.
If you’ve tried everything and you’re still stuck at the point of getting the openai module imported, I’m most responsive on Instagram. Shoot me a DM @codecopycoffee with the error you’re getting and I’ll do my best to help.
Making Your First API Call to ChatGPT
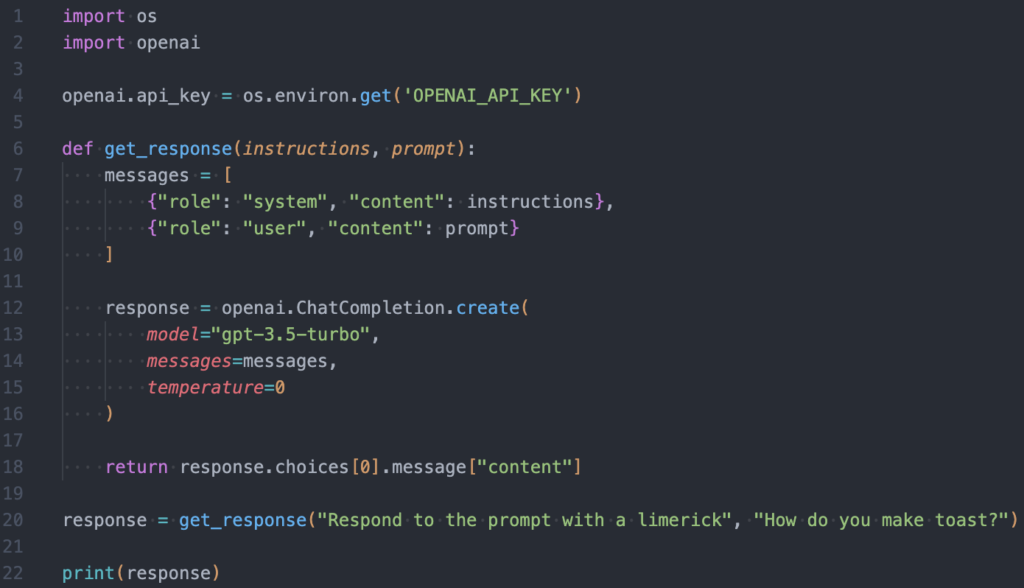
Now that our imports are working and we have confirmed that our API Key is being located as expected it’s time to make our first API call! We’re going to use the built-in create() method of the openai module’s ChatCompletion object to ask Chat-GPT a question, and then we’ll output the response. Let’s start by defining a function that takes two arguments, instruction and prompt. Inside that function we will define an array variable called messages that uses those arguments:def get_response(instructions, prompt):
messages = [
{"role": "system", "content": instructions}
{"role": "user", "content": prompt}
]
We use roles when communicating with Chat-GPT to allow the model to distinguish between the types of information it receives. Messages from the system role are instructions given by the developer (or the marketing professional, or the customer service rep, or whoever is programming the model to interact with end users). These messages inform the model’s behavior when responding to user inquiries, such as using a particular tone or responding with a certain number of sentences. Messages from the user role are end-user prompts. In a live program you would take user input, but for the sake of this example we are going to supply a hard-coded user message.
Inside the same function we’re now going to use the ChatCompletion.create() method:response = openai.ChatCompletion.create(
model="gpt-3.5-turbo",
messages=messages,
temperature=0
)
You’ll see that we are passing in the model of Chat-GPT we want to use, in this case gpt 3.5 turbo. Next we pass in our messages array. The last argument, temperature=0, refers to a measurement of creativity of the model’s responses. Lower temperatures are intended to produce more correct, direct responses. Higher temperatures allow more room for creativity. This is a fun setting to play around with once you’ve gotten the hang of making requests!
Next, we’ll return the response from Chat-GPT:return response.choices[0].message["content"]
Finally, we’ll call the function and supply two strings as arguments – the first one is our instructions for the model, and the second is the user prompt – and print the result: response = get_response("Respond to the prompt with a limerick", "How do you make toast?")print(response)
I prefer to break this up into two lines because in a real program the print line will be for testing purposes only and you would then delete it or comment it out and continue with your program, but you can do it in one line and print the result of get_response() without saving the output to the response variable first if you prefer.
When you put it all together, this is what you should have:
import os
import openai
openai.api_key = os.environ.get('OPENAI_API_KEY')
def get_response(instructions, prompt):
messages = [
{"role": "system", "content": instructions},
{"role": "user", "content": prompt}
]
response = openai.ChatCompletion.create(
    model="gpt-3.5-turbo",
    messages=messages,
    temperature=0
)
return response.choices[0].message["content"]
response = get_response("Respond to the prompt with a limerick", "How do you make toast?")
print(response)
Save and run your Python file, and you should be rewarded with a limerick giving you instructions on how to make toast! Here is the limerick I got:To make toast, it's really quite grand,
Just pop bread in a toaster, you'll understand.
With a click and a hum,
It'll soon become,
Golden brown, crispy, and oh so grand!
Now that you have the basic format down you can play around with different system instructions, user prompts, and temperatures. I understand how overwhelming documentation can be when you’re first starting out which is a big part of why I write these blog posts, but I really do think the OpenAI API documentation for GPT is pretty great, so when you’re feeling bold definitely check that out for additional inspiration and guidance.
I have more AI-related and Python-focused content planned (next up: OpenAI’s Content Moderation API) as well as some PHP and Bash (come on, it’s still me) goodies to bring you, so stay tuned for more educational content coming soon!
</ XOXO>
Enjoy my content and want to show your appreciation? You can share this post, pay it forward by teaching someone else, or buy me a coffee!
[Photo credit: Hitesh Choudhary via Unsplash]